


Good wheelchairs don’t come cheap, and neither do service visits. Learning how to keep your chair in tip-top shape, including how to make adjustments and fixes when needed, can save you tons of money and spare you the interminable wait for a repair person, all while prolonging the life of your ride. With that in mind, here are three guides — two for manual chair users, and one for power chair users — to save you time and money taking care of your chair.
Tuning Your Manual Chair For Maximum Performance
Dial In Your Seating Position Without Changing Your Chair
Simplifying Life With Power Chairs
Tuning Your Manual Chair For Maximum Performance
by Bob Vogel
With a little maintenance, a manual chair should retain top performance indefinitely. I have friends that are styling around in chairs that are over 25 years old and still perform like new thanks to their owners’ TLC. In addition to making sure the upholstery, screws, nuts and bolts stay snug, here are tips I’ve learned to keep your chair at maximum performance for the long haul.
Tires
The easiest, and most noticeable, way to maximize chair performance is to regularly check your tires’ inflation. Under-inflated tires are one of the worst ways to undermine your chair’s performance. I keep my tires at the maximum suggested pressure — expressed as PSI and listed on the side of the tire. I prefer a rechargeable, automatic pump for inflation, because it makes topping off a snap. I use a Campbell Hausfeld CC2300 pump — it’s fast, has a built-in pressure gauge and can fill high pressure tires.
The next tire item to keep an eye on is wear. When the performance-robbing flat spot develops and the middle of the tire starts growing wider, it’s time to change tires.
When purchasing replacement tires, be sure to get the proper size tire for your rim. The size should be listed on the side of your tire, either 24 inches (540), 25 inches (559), or 26 inches (590). When ordering tires, I include an extra set of tubes in case of a flat or other problems when removing the old tire.
You will need to get a set of tire levers to remove the old tire. I prefer using plastic levers because they don’t scratch the rim. I also keep a set of stainless steel levers for removing stubborn tires. For easier tire mounting, I use a tire bead jack, which easily pulls the new tire bead over the rim.
Rear Wheel Care: Spokes, Axles & Brakes
Once your tires are properly inflated, the next thing to check is spoke tension. Spokes should feel firm, and any loose spokes should be snugged, something that is easy to do with a spoke wrench. If you notice one or both wheels are out-of-round —warbling from side to side — it is time to take it to a bike shop and have them trued, or straightened, which requires a truing stand. Note: Spinergy wheels require a Spinergy spoke wrench, which comes with a new set of wheels. Replacements are available directly from Spinergy or from SpinLife.
The next rear-wheel task is keeping your quick-release axles clean. Clean the axles with a dry cloth and wrap a cloth around a screwdriver to clean the axle receivers. I find a dry cloth doesn’t make my axles and receivers spotless, so I use a light spray of WD40, let it sit for a minute or two and then wipe it off, which leaves the axles and receivers spotless. In moist or salt water environments, a thin coat of Teflon-based spray or a silicone lubricant spray with Teflon, helps keep corrosion at bay.
After the axles, move on to the rear wheel bearings to be sure they spin freely. Rear wheels use half-inch sealed bearings. I always order eight bearings at a time because they are the same ones used in front caster fork stems.
Last but not least, check to be sure your wheel locks are snug, usually as simple as finding the right Allen key set. Check your manual to see if you need a metric or imperial set.
Your local bike shop is a great option if you don’t feel up for tackling these tasks or want to see them done to learn, says Bob Vogel. “I’ve found bike shops are happy to change a tire for a nominal fee while you wait. However, most bike shops don’t carry high-pressure tires in wheelchair-rim size, so order your tires in advance. Replacing rear wheel bearings is another task I prefer to have experts at a bike shop handle. Fortunately, they are the least likely bearings to go bad.”
Front Caster Fork
The first thing to check here is the area between the caster fork and the wheel, which, in my experience, has a unique power to pull carpet fiber, human hair and dog fur into its vortex. If it makes its way into the bearings, it can cause them to prematurely fail. The best way to remove bearing crud is with tweezers or a thin set of needle-nose pliers. Between my German shepherd service dog and my daughter’s Australian shepherd, I find that hair removal is a several-times-a-week task.
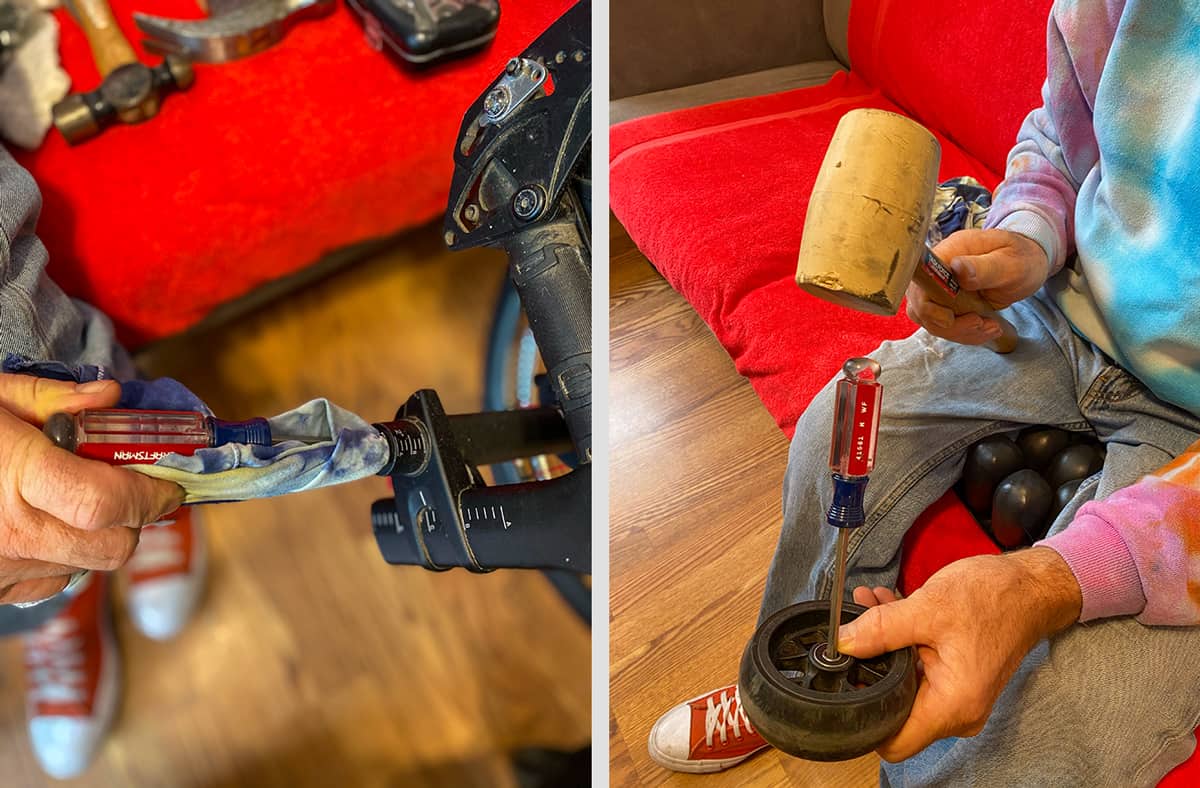
This is also a good time to be sure caster bolts are snug and to give each one a spin to check the bearings. Most wheelchair caster bearings are 5/16 inch and cost around $5 per bearing. Note: TiLite chairs with single sided forks use a different size “R6” bearing.
Prior to replacing caster bearings, check your casters for performance-robbing wear: if there is a sizeable flat spot in the center, now is a good time to replace them. Casters are available online, often for less than market price, and as a bonus, many come with caster bearings installed.
To replace just the caster bearings, loosen and remove the caster bolt and pull the wheel off the bearing. Be mindful of spacers outside the caster wheels as well as a spacer sleeve in between the bearings — I lost a few in my early repair days. Bearings generally come out with a couple taps of a rubber mallet on the end of a straight slot screwdriver placed against the bearing. I use a double-faced soft mallet. When re-assembling the caster, make sure the bolts are snug and don’t come loose.
Maintenance Kit
You can find the majority of tools you’ll need to take care of your chair online. There are a number of DME retailers, many of whom offer prices below market value. I’ve had particularly good luck with DME Hub and Sportaid.
Backup tubes, $6.25
Campbell Hausfeld CC2300 pump, $89
Park Tool plastic levers, $6.50
Tragoods stainless steel levers, $8.99
Tire bead jack, $10.99
Spoke wrench, $6
Half-inch sealed bearings, $6.50
Caster bearings, prices vary by model.
Tires start at $39 per pair.
Resources:
[fusion_youtube id=”youtube.com/watch?v=ipLgkE-5gaE” alignment=”” width=”” height=”” autoplay=”false” api_params=”” hide_on_mobile=”small-visibility,medium-visibility,large-visibility” class=”” css_id=”” /]
How to Replace Caster Bearings
[fusion_youtube id=”youtube.com/watch?v=OzouBVixLuw” alignment=”” width=”” height=”” autoplay=”false” api_params=”” hide_on_mobile=”small-visibility,medium-visibility,large-visibility” class=”” css_id=”” /]
Caster Fork Bearing: Removing a bearing from a standard fork mount:
Dial In Your Seating Position Without Changing Your Chair
by Seth McBride
The right seating position in a manual wheelchair can make the all the difference in your everyday functionality and your long-term health, affecting everything from balance to skin and shoulder health. The ideal seating position is different for everyone — an interplay between your body’s dimensions, your function and your day-to-day life. It’s a process to find what works best for you.
Fortunately, if you’re in a wheelchair that doesn’t feel right, there are a number of adjustments you can do and components you can swap that can make a big difference for your seating position.
Warning: Changing your seating position can significantly alter pressure distribution. Check your skin religiously whenever you make changes, and if you are at risk of skin breakdown, consulting a physical therapist with experience in pressure mapping may be a good idea.
Changing Front Seat Height

If you have room to spare between your knees and a typical table top, raising your front seat height is worth considering. A discouraging percentage of physical therapists have people sit in a minimum of dump. It’s usually out of the belief that a flat seat reduces pressure on the sit bones. But what this doesn’t take into account is that in real life, someone without strong core muscles who sits in a flat-seated chair will likely slouch to maintain balance. This puts extra pressure on the coccyx and can lead to pressure sores. Not having any core, I’ve found that the only way to maintain an upright seating position without falling over my lap every time I try to move is to sit with a lot of dump — as in a 4-to-5-inch difference between front and rear seat height.
One option is to raise front seat height and put bigger front casters on. My go-to casters are 4-by-1.5-inch soft roll casters, but in my previous chair I went to 5-inch casters to increase my dump by an inch. Make sure you have clearance for the larger casters to rotate without hitting your feet or footplate and that your fork has room to fit them as well. Websites like SpinLife and DMEHub have soft roll casters starting at about $45 each.
Additionally, you can put more spacers, which are found at most hardware stores, under your caster housing to raise your front end up. How much you can raise using spacers depends on the specific model of your chair. If you can’t raise it enough using spacers, looking online for a taller fork can do the trick. Note: Raising front seat height changes the caster fork angle and can cause caster flutter or sticky spots when turning. The more you raise your seat height, the more noticeable the difference. If your caster fork barrels are adjustable, check them with a pocket level or square to make sure they are at 90-degrees and adjust as needed to keep them in line.
Rear Height
If you have a chair with an adjustable rear seat height, play with it. Sure, it’s nice to be able to reach high cabinets, but in addition to balance and posture benefits, a lower rear seat height — sitting down in your wheels rather than on top of them — can give you better leverage to push your chair.
If you have a fixed rear seat height, unfortunately there aren’t many ways to alter it other than changing your rear wheel size, and going from a 25-inch rear to a 24-inch rear wheel only changes your seat height a half an inch. But, changing your rear wheel size can have another effect on your pushing that’s worth considering.
If you live in a flat area with little need to push hills on a daily basis, larger wheels like a 26-inch can give you more distance per push, making it quicker and easier to cover distance. If your day-to-day includes a lot of hills, going down to a 24-inch could make it a little easier to get up the steep stuff. Personally, I have good arm strength but live in a hilly area, so 25-inch wheels hit the sweet spot.
DIY Ergo
Ergo seating is a still-fairly-uncommon seating setup where the frame rails extend straight out for 4-to-6 inches before they angle up. This creates a bucket that holds your pelvis in place better than traditional dump. If you’re active and don’t have core strength, I can’t recommend it enough.
For a preview of what ergo feels like before you fork over thousands of dollars for a new frame, you can make a DIY version using a foam wedge under the front of your regular cushion. A few years ago, I made a wedge using strips of gym flooring mats duct taped together, which made it easy to play with dimensions until I found something I liked. If you’d prefer a premade (and less janky-looking) version, Stimulite sells a 2-inch-high wedge cushion for just under $100.
Another option is to get a Roho Quattro cushion, which has four air compartments and a valve that lets you seal off the air flow between them. Slightly overinflate the cushion and sit down with the valve open. Put your feet up on a couch, bed or other high surface — which will put more of your weight on the back of the cushion. Let the compartments adjust and then, while your feet are still up, lock the valve.
It may take a few tries to figure out the best amount of air in the cushion. In the end, you should wind up with the rear compartments deflated to your normal Roho pressure, while the front two compartments will be overinflated, pressing up into the back of your thighs, where you have enough meat to handle the extra pressure. This is similar to what a Ride cushion does. Quattros are available from your local DME supplier or a variety of online retailers.
Back Angle
If you change your dump, you’re probably going to need to change your backrest angle along with it. Many chairs come with angle-adjustable back rest bars, but there are options even if yours is fixed. Many backrest shells offer angle-adjustable hardware. My personal favorite is the Roho Agility Active, as it’s adjustable without clunky, heavy hardware and has an air insert in the middle of the backrest to better protect the skin over my bony spine. If you use an upholstery backrest, adjusting the individual tension straps — tighter at top, looser at the bottom, or vice-versa — can effectively change your backrest angle.
Simplifying Life With Power Chairs
by Jenny Smith
With the complicated electronics and seating systems on modern power chairs, maintaining my chair — my life — can feel overwhelming. I’d rather avoid problems than have to fix them. But issues still arise. Whether it’s a cushion, a small part, or a major fix, always expect a long wait with DME providers and insurance. I try to avoid the long delays by practicing these tips:
• Know the terms of the warranty: What is covered under the warranty and for how long? If your chair is “glitchy,” have it checked before the warranty expires. Repairs made under the warranty seem to happen faster since insurance isn’t involved.
• Always have a backup cushion available: Most insurance companies will pay for a new cushion every three years, so even if you don’t need one quite yet, stay ahead of the game.
Where to Buy Online
Sportaid
DME Hub
SpinLife
1800wheelchair.com
• One-stop shopping: When I ordered the new cushion, we requested new batteries, armrest pads, a lumbar support, and upholstery for the backrest. It was more convenient to do everything at one time since we needed to get an order from my doctor, a letter of medical necessity and go through the long wait of insurance approval.
• Get to know your tech: I’ll often call my tech first, and he can tell me what to do to avoid a service call. But for this relationship to work, direct your frustration over slow response times at the DME provider or insurance company — not the tech, who is just doing his job.
• Just ask: For example, as a quad, I couldn’t remove a broken lock on my armrest by myself. Learn to be willing to ask for help.
• Learn from others in the SCI/D community: I asked members in an SCI support group on Facebook how to disassemble the broken lock. With the instructions I received, I walked my helper through the steps of removing the part. I had a functioning, albeit non-locking, armrest until the new part arrived.
• Do your research before you order: Find the owner’s manual and order form for your chair online. Get familiar with the available options, such as the seat width and depth, turn radius, base width, tilt or recline features, or ground clearance.
Support New MobilityWait! Before you wander off to other parts of the internet, please consider supporting New Mobility. For more than three decades, New Mobility has published groundbreaking content for active wheelchair users. We share practical advice from wheelchair users across the country, review life-changing technology and demand equity in healthcare, travel and all facets of life. But none of this is cheap, easy or profitable. Your support helps us give wheelchair users the resources to build a fulfilling life. |

Recent Comments
Abdul Mansour on Testing Two New Seat Designs That Will Let You Fly in Your Wheelchair
Alejandra on Adaptive Products Roundup: May 2026
Lisa Blinn on A Malpractice Case Against ParkingMD