

My wife and I recently bought a duplex with my sister, a three-story, 1916 craftsman with no hint of accessibility to it. Where we’ve lived previously, accessibility modifications have been minimal — a ramp to get in, a shower bench and a grab bar for the bathroom. As long as there aren’t a bunch of different levels and the doors are wide enough to fit my chair in, I can typically make do without a lot of specific accessibility features, or so I thought.
The main floor unit of the house, where we now live, has a tiny bathroom with a claw foot tub and an ill-designed kitchen with an island jammed in between an alley of cabinets. The rest of the house is beautiful and had exactly the kind of space and character we were looking for. So, I pulled some rose-colored glasses over my eyes, and we decided to go for it.
Once we moved in, I realized that, technically, I could make it work. But this didn’t factor in how much of a pain in the ass it would be to transfer into and out of a claw foot bathtub every day and do dishes in a space where Kelly couldn’t squeeze past me while I was at the sink. We knew we’d have to make some changes, but with a crazy local real estate market we didn’t have the money for a professional remodel. DIY to the rescue.
Claw Foot Shower Bench
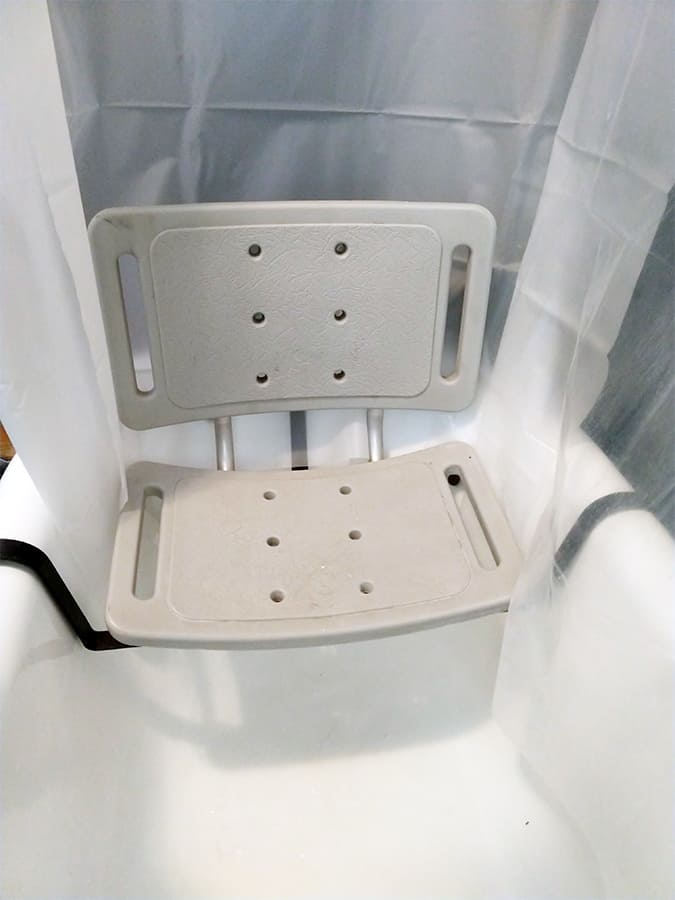 Claw foot tubs are tricky. You can’t put a regular shower bench in one because of how the tub walls slope, but if you were to just secure some sort of seat across the top, you wouldn’t be able to get a shower curtain down into the tub. I put the problem to my dad, a retired heavy equipment mechanic, welder, amateur machinist and general do-everything kind of guy.
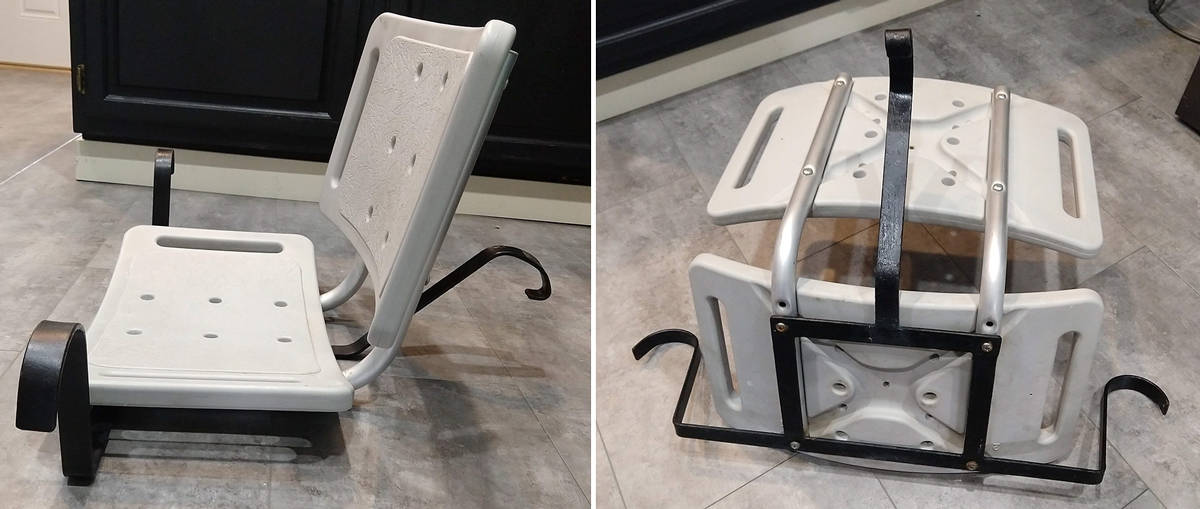
After he let the problem marinate for a few days, his solution was a sort of hanging basket. Pieces of flat bar would hook over the rim of the tub — one on each side and one in the back — then angle down into the tub before flattening out to create trusses to which a seat could be attached. Because the seat would sit just below the rim of the tub, I’d be able to get the shower curtain down into the tub, thereby avoiding soaking the bathroom every time I showered. “Brilliant,” I said after he told me the idea.
“I guess we’ll find out,” he shrugged.
At first, my dad was planning to make some sort of seat. Then he found an extra shower bench in our work shed. The seat and backrest are self-contained, secured to the legs by a couple of screws. Why fabricate a new one when you can just adapt what you already have?
After taking the measurements, cutting, welding and bending the frame to fit our particular tub, he secured the shower bench seat to the frame with a couple of spacers and the bolts that originally had attached it to the legs. The finishing touch was to spray the steel frame with some Flex Seal, a rubberized paint, so that it wouldn’t rust or clank too much on the cast iron tub.
I happen to have a dad-of-all-trades, but a handy chair user or just about any machine shop could easily weld and bend a similar frame. Attaching a shower bench seat is as simple as drilling a few holes and screwing it on.
The setup works as both of us had hoped. The transfer still isn’t easy. I have to throw my legs into the tub first to get decent leverage. But it’s a hell of a lot easier than going down to the floor of the tub and back out. And all the water stays in the tub. As my dad said when he finished,
“I guess it’ll work.”
Kitchen Remodel
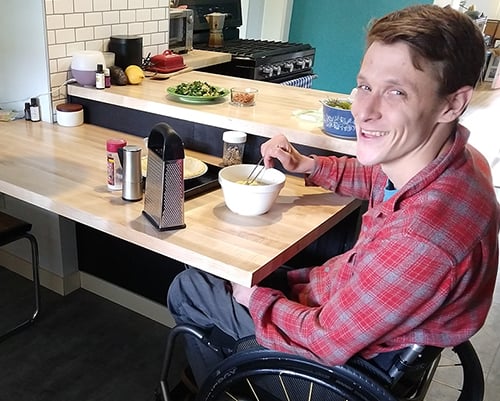
There’s nothing easy about a DIY kitchen remodel. Ours took six adults — two of whom built their own houses — 10 days of work. But we did the whole shebang, as we figured we might as well do it all at once. Some of the goals were aesthetic, as everything was old, grimy, and “in a state of deferred maintenance” as our home inspector put it. My main accessibility concerns were opening up the layout and changing out the sink, as it was a deep, double-bowl cast iron sink that was difficult for me to use.
To open up the layout, we ripped out the island and put a peninsula perpendicular to where it had been. Behind the peninsula was the only place to put a kitchen table, so we decided to install a built-in table that would be supported by some beefy shelving brackets so I could roll under it without having to worry about running into the table legs. We chose butcher-block style counter tops for looks, price (they’re less than half the price of stone) and for adaptability. Because they’re made of actual wood, anyone with some basic carpentry skills can modify them, whereas stone or concrete take some serious skills and specialized tools. We made the table out of the same butcher block as the counter tops.
An unexpected bonus with putting a table set lower than the countertop height is that I can use it as a food prep area. It’s still central to everything in the kitchen, but I can roll under it and it’s at a height that is functional from a chair. I’d never had anything like this, but as soon as I started using it for food prep, it made everything — cutting, stirring, grating, mixing — much easier and less time-intensive.

.
We used the same shelving brackets to support a narrow countertop next to the stove instead of putting in a cabinet. This allows me to roll under it, right next to the stove and have easier access to items cooking on that side’s burners. We also have a Breville toaster oven on that counter, which operates as well as a normal electric oven, just smaller. Considering that my baking repertoire consists of nachos, pupusas, fish sticks and quiches, it works perfectly (yes, it fit and cooks a 9 inch pie crust quiche with no issues). And it’s much easier to use than lifting pans in and out of a regular oven.
For the sink, our dads cut a countertop hole, and we chose a large, stainless-steel rectangle that is only 9 inches deep. The large single bowl and shallow design are key for me. There’s enough room for me to get my elbows in there for leverage. This is important, as my hands are pretty weak, and not having to reach down a couple extra inches is huge when you’re coming at dishes from a seated position. Sometimes simple is best.
Do you have any DIY home modification tips or stories? Share them with us — online, social media, email, old-fashioned letter, however you want — and we’ll put up a blog post on Newmobility.com with your best ideas for making your home functional without breaking the bank. Happy hacking.
Support New MobilityWait! Before you wander off to other parts of the internet, please consider supporting New Mobility. For more than three decades, New Mobility has published groundbreaking content for active wheelchair users. We share practical advice from wheelchair users across the country, review life-changing technology and demand equity in healthcare, travel and all facets of life. But none of this is cheap, easy or profitable. Your support helps us give wheelchair users the resources to build a fulfilling life. |

Recent Comments
Stefan Schönfelder on Testing Two New Seat Designs That Will Let You Fly in Your Wheelchair
Robert on A Malpractice Case Against ParkingMD
Robert on A Malpractice Case Against ParkingMD