

Death Defying Cheapo Elevator
It started with my Hippie-Dream, way back when President Tricky Dick Nixon was busy erasing incriminating tapes from the Watergate Scandal. My girlfriend and I wanted to escape it all, but we couldn’t find a way to stop the Earth long enough to hop off, so we did the next best thing: we moved to Orygun to hide out in the woods and live in a dome with a loft.
Problem Number One: Where to Get Money
OK, forget the money. Instead we had to find a cheap way to live. Today it’s yurts and tiny houses. Back then it was the geodesic dome. So we drew up plans for a modest dome — no corners, perfect for my wheelchair — except for one small design quirk: my girlfriend wanted a sleeping loft.
Problem Number Two: How to Access the Loft
Since “keep it simple” was the mandated theme of my life, I planned to drop a rope through a circular hole in the loft floor (remember, the dome was in my head) and climb up and down with my bare hands, legs dangling. But that would mean having two wheelchairs, one up and one down, as well as two bathrooms, more money, and the strength of a gymnast.
It took about five years for the Dome Dream to dissolve due to lack of money and dwindling imagination. As fortune had it, though, we came into some money and eventually were able to purchase an old farmhouse. Two stories, all bedrooms upstairs. Not very smart, but we were young, stupid, and now married, which meant it was time to start planning and leave behind whimsy. So we added a bedroom on the lower floor — simple, no frills, except for a closet that connected to an upper story closet, creating an instant elevator shaft.
Problem Number Three: How to Afford the Elevator
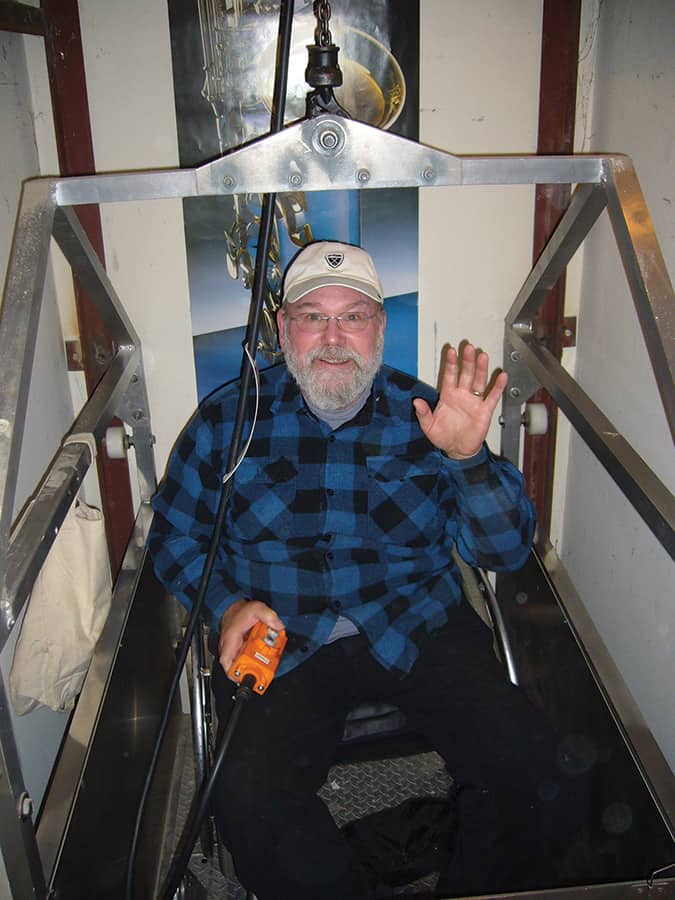
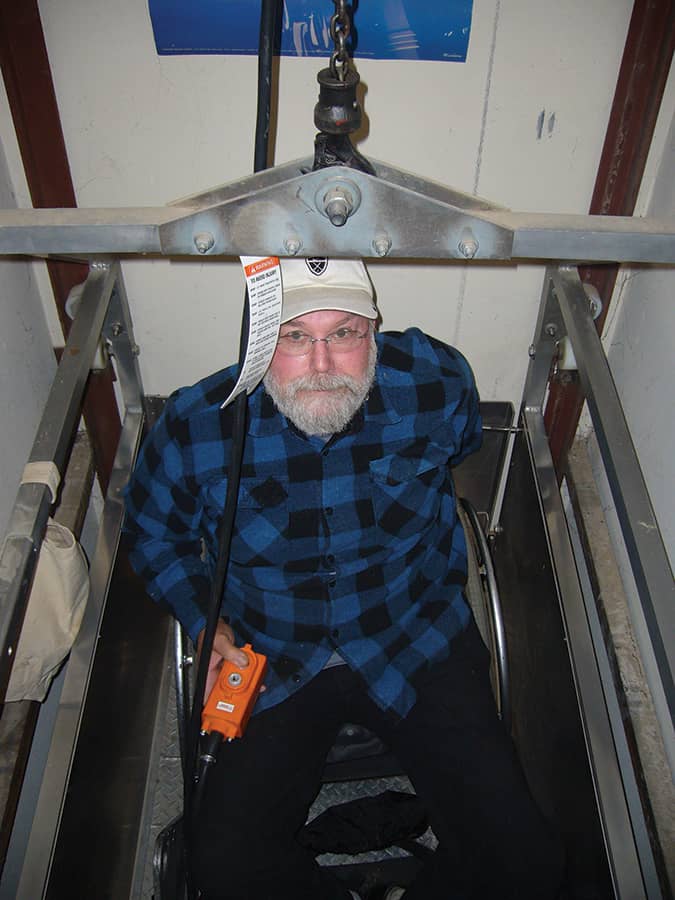
OK, forget the elevator. Way too much money. What about a simple winch? One with no motor. That’s right, a hand-crank winch attached to a simple mine car/A-frame made from aluminum that would travel up and down in the closet-shaft. A stroke of genius, or possibly the first hints of dementia.
Problem Number Four: Who Would Build It?
Not me. And no one in their right mind. Given the code-defying design, liability concerns could mean the death of the project, me, my wife, the builder and anyone foolish enough to ride the thing. The obvious candidate was the beer-guzzling guy in town who had welded the frame on my chair dozens of times. He was just confident and crazy enough to say yes. So I drew up a simple plan with dimensions that fit my closet-shaft, and my chair, and left the rest to him.
“I’ll build this thing so strong it will last beyond Armageddon,” he said, belching. He chose diamond plate aluminum for the floor, a different kind of aluminum for the doors and .25-inch angle iron for the “track”/supports that ran vertically in the shaft and created a standalone steel frame strong enough to hoist a Mack truck. The mine car would weigh in at a scant 300 pounds, 550 with me and my stainless behemoth-chair, and the hand-crank winch would be rated to lift half a ton — 1,000 pounds.
He made the box in his shop and delivered steel pieces in 6-foot sections that he welded together in the shaft and bolted to the wooden frame of the shaft. “The beauty of the design is the angle iron supports everything and works like a track, but the hard plastic wheels on the car never touch them. If the car swings a little, they might touch, but it’s just a friction-free design that keeps the car from swinging too much. That way you won’t wear your arms out cranking the thing up and down.”
Problem Number Five: Friction or Not, My Arms Wore Out
The box only traveled about a half-inch with each stroke, so to travel 9 feet (108 inches) it took 216 arm pumps to get upstairs and another 216 to get down. My arms lasted about two years. Then I gave up and bought an electric winch with handheld remote control.
Problem Number Six: What Happens If the Power Goes Out?
Obviously I would be stuck upstairs or halfway between floors, and yes, it happened about three times in the next 30 years. Not bad, considering. If I was upstairs, I just waited until my wife came home, then managed to scoot downstairs with her help. To practice for getting stuck in-between floors (this happened twice, both times prior to the cell phone era), I worked on two important skills — screaming at the top of my lungs and thumb twiddling. And oh yes, nice neighbors were also part of the plan.
It has now been 33 years since I first cranked my way to the upper floor, and the death-defying winch/elevator/mine car still works great.
Total elevator cost: $3,000 in 1982 currency (after adding on the bedroom with the closet/shaft).
Problem Number Seven: Keeping the Inspector Out of the House …
Multi-Purpose Stuff Holder
By Kary Wright

One of the things that has helped me immensely over the last 25 years or so was invented by a good friend of mine, and has been tweaked over the years to include more attachments. It is a multipurpose unit that holds many different things for me. It is very inexpensive. Initially the copper pieces all came from the local hardware store, which has since been replaced with a welded steel unit that is more durable.
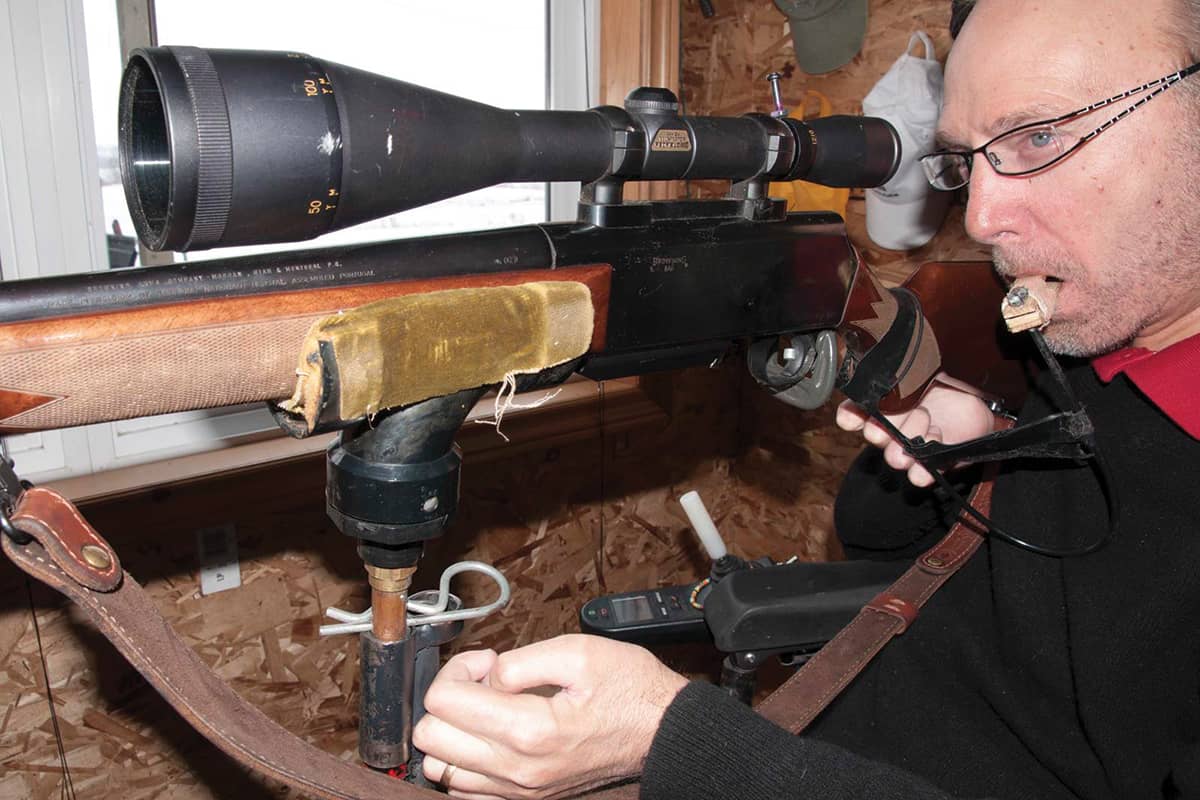
Shortly after being discharged from the hospital I wanted to return to my favorite outdoor activities. One of them was shooting and hunting. We needed to figure a way that I could hold a rifle steady, and be able to turn my wheelchair at the same time to safely aim. At that time there were no commercially available adaptations that I knew of to hold a rifle, and I did not have the money to buy much of anything anyhow.
Starting with a few pieces of copper pipe, lots of elbows and T fittings, and some solder and a torch, away we went. By the end of the day we had a prototype built, and I was shooting a rifle! This first holder was used as-is for more than 10 years. We have since added attachments as need arose.
The main piece is a simple J-shaped piece of pipe, with a T pipe welded on the end. To install it to your wheelchair, you simply pull the armrest off of your wheelchair using the quick disconnect, and fit the short T over the top of the armrest before putting it back on. That’s it. It will now swing around in front of you and hold various items according to the attachments, or it can swing around behind you when you are doing other things that require it to be out of the way, such as driving a vehicle.
To fit a gun to the unit, we took a 2-inch PVC T-fitting and cut the top out of it so a rifle could sit in it (see photo, page 26). We padded it so the plastic would not scratch the gun. Then we attached a pipe to the bottom of the T-fitting so it can be placed on the gun rest that is attached to the wheelchair. It has since been used to hold a variety of different rifles, and in the last few years, even crossbows!
More Stuff That Needs Holding
As a newly injured person, I found that I was often spilling coffee and burning myself quite badly. I needed to find a way that I could safely have hot drinks. After the gun rest was invented, we soon made a small attachment for a travel mug handle to fit in, and voila! — no more coffee burns! I have had my cup hanging on this for probably 15 years now!
When they became available, we acquired a digital camera and a video camera. We soon realized that it would be possible for me to operate these and open up a whole new world. We made a camera holder using the old tried-and-true soldered-copper-pipe and the top taken off of a tripod. I have enjoyed this hobby ever since.
As time went on I wanted some way to read books, and still be able to move my chair and bring the book with me. Since the gun rest was already attached to my wheelchair, it made sense to build a book holder attachment that would fit to it. It turned out great and can also be used as a table to eat from if need be. As technology advanced, it became a Kindle holder, then a radio holder for radio controlled aircraft. It is also great for holding a GPS while traveling, a tablet, controller for a drone, television remote controls, and wireless keyboards for computers!
This home-made multipurpose holder has greatly increased my independence, and opened up many new hobbies. I believe total cost has been under $50, some thinking, and once again, a little help from my friends!
Lotions, Elixirs and Soaps For Everything
That Ails You
by Roxanne Furlong
As a lifelong crafter, frugalista and lover of everything homemade, I’m always looking for ways to do-it-myself to save money while feeding my habits, er, hobbies. A few years ago, I started making my own lotions, soaps and remedies because of allergies and sensitivities to many additives in products. Plus, as a wheelchair user, some daily living tasks are difficult to perform, like shaving or washing my hands.
Skin Infection Remedy
Due to weakness in my shoulders from muscular dystrophy, my right shoulder droops so much that the skin of my arm and side are always touching, creating a breeding ground for a candida infection in my armpit. Commonly called a yeast infection, candida is found in skin folds, typically under arms or breasts, between toes, in the groin area and at the bends of elbows and knees. This touching of skin causes fungus overgrowth — itchy and extremely painful. You may notice a white, creamy substance or dark red rash at the infected area.
I had problems for years under my arm and tried several dermatologist-prescribed creams and powders. None of these stopped the infection, let alone reduced pain or itch. During this time, I was having stomach issues and started researching candida, which internally can cause problems with your digestive tract. I came across the 1958 book, Folk Medicine, by Dr. D.C. Jarvis, a proponent of the benefits of apple cider vinegar. Thinking it might at least calm the itching or pain of my skin infection, I gave it a try. Not only did it stop the pain and itch, the infection was gone within two days. I continue to use it when the infection flairs.
In a sealable container, combine one part apple cider vinegar to three parts water. I use a small, 2 ounce plastic bottle so the solution stays fresh. Apply as needed with cotton balls to infected area. It stings upon application but nothing like the pain of the infection. It usually takes two to three daily applications for one to two days to eliminate flare-ups. This elixir can also be swallowed to combat thrush of the mouth, sore throats or colds: Add a little honey to the above recipe, add heat and it will taste tea-like.
Antibacterial Soap
Antibacterial soap is great for hand washing if you don’t have roll-under sinks or you have helpers who need to clean their hands frequently. Problem is, the active ingredient, triclosan, is very drying and usage is controversial. According to the Mayo Clinic, research shows that triclosan altered hormone regulation in animals, and might promote development of antibiotic-resistant germs or be harmful to the immune system.
When I use purchased antibacterial soap, my hands become painfully dry. I decided to find a better solution. A web search offered a wide range of recipes, some of which use hard-to-find or expensive ingredients or are too putzy to make. Having used tea tree oil (melaleuca oil) in the past as an antifungal, I knew it was also an antibacterial and decided to keep my recipe clean, simple and inexpensive. Tea tree oil works great for toe fungus or other skin infections and, according to the Mayo Clinic, has shown “activity against” MRSA.
My recipe is non-drying and safe, and uses only two or three all-natural ingredients. Tea tree oil is available at most pharmacies, including Walgreens, CVS, Rite Aid, Target and Walmart. It has a strong camphor smell, which I don’t mind, but there are several essential oils that will tone down and enhance the fragrance. It should not be used on children and is toxic when ingested.
Recipe: Using a 1 ounce spray bottle, add 15 drops of tea tree oil, and if desired, five to 10 drops of one or two of the following oils: lavender, peppermint, yling ylang or lemongrass. Top off with enough distilled water (not tap or spring water) to fill the bottle. My favorite fragrance combination is 15 drops of tea tree oil with seven drops each of lavender and peppermint.
To use as a toenail fungus treatment: Spray infected toenails twice daily. Toenail fungus is hard to treat. With this or other treatments it can take from two to six months.
Shaving Made Easy
My last recipe was borne from frugality. I bought a small but expensive tub of Lush Cosmetics Dirty Shaving Cream for my husband a couple years ago. He loves it because it gives an easy, clean shave and without needing to rinse off the cream, it leaves his face feeling “like a baby’s butt.” I love it because without needing to rinse and wipe off the cream, it’s that much easier to shave my legs while I am sitting down.
This recipe uses ingredients that are easily obtained at various grocery stores, pharmacies and natural stores. Alternatively, all of the ingredients plus a huge variety of essential oils can be purchased from www.BrambleBerry.com.
Find a combination of oil/fragrance that you like that equals 10 to 12 drops. Sandalwood and cedarwood essential oils are both used in Lush’s shaving cream. They are expensive but you only use drops per batch and the resulting cream smells great on men or women. Depending on your heating method, use glass or metal when mixing ingredients; plastic will absorb fragrance and oils.
Recipe for Shaving Cream:
2/3 cup shea butter
2/3 cup coconut oil
¼ cup olive oil
2 tbl. baking soda
¼ tsp. pure lanolin
1 capful vitamin E
4 drops each lavender, cedarwood and sandalwood or other essential oils
Slowly melt shea butter and coconut oil in a small saucepan on the stove or in a glass bowl in the microwave in 10 second intervals. Remove from heat and stir in olive and essential oils; refrigerate for two hours. Remove from fridge and let sit for 10 minutes until slightly softened. Using a hand blender or mixer, slightly beat, then add lanolin and vitamin E; beat thoroughly until light and fluffy or until it becomes the consistency of frosting. Pack in jar and use about a tablespoon for face or per leg.
Support New MobilityWait! Before you wander off to other parts of the internet, please consider supporting New Mobility. For more than three decades, New Mobility has published groundbreaking content for active wheelchair users. We share practical advice from wheelchair users across the country, review life-changing technology and demand equity in healthcare, travel and all facets of life. But none of this is cheap, easy or profitable. Your support helps us give wheelchair users the resources to build a fulfilling life. |

Thank you for these recipes, you sound about my age and as though you have similar values, thus gifting the readers with some very useful recipes. I use a candida Dr’s expensive prescription that doesn’t really work, I am happy to find one I can afford. The shaving and skin softener uses stuff I already have-even better. Now if I could find a way to travel by plane I could afford I’d be all set.
Seriously,
Thank you